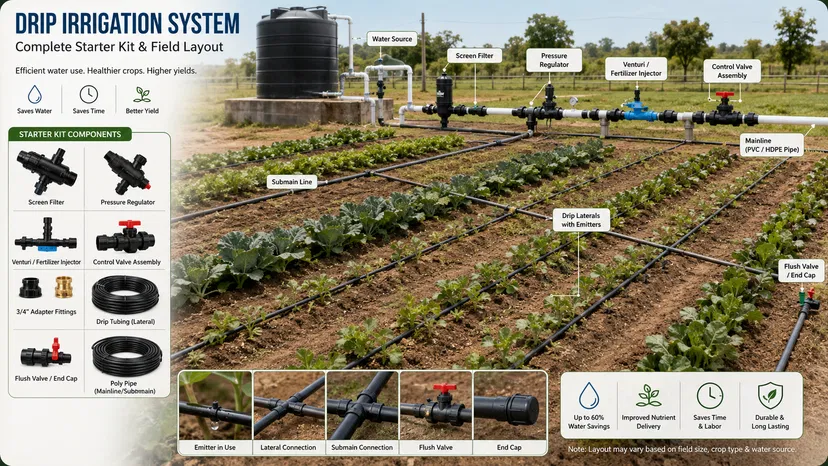
Water is one of the most valuable resources on any farm, and using it efficiently can make a major difference in crop health, yield, and operating costs. A well-designed sprinkler irrigation system helps you deliver water evenly, reduce waste, and keep your fields productive even during dry spells. If you are planning to install one on your farm, the right setup can save time, improve coverage, and support healthier growth across a wide range of crops.
In this guide, you’ll learn how to set up a sprinkler irrigation system on your farm, what equipment you need, and how to plan for long-term performance. Whether you manage a small acreage or a larger commercial operation, the basics remain the same: design carefully, install properly, and maintain consistently.
Why Choose a Sprinkler Irrigation System?
A sprinkler irrigation system is one of the most versatile irrigation methods for farms. It works by distributing water through pressurized pipes and sprinkler heads, simulating natural rainfall across your crops. This makes it suitable for many field crops, pasture, vegetables, and orchards.
Key benefits include:
- Even water distribution across large areas
- Better control over irrigation scheduling
- Reduced runoff compared to flooding methods
- Adaptability for different crop types and field shapes
- Improved efficiency when designed correctly
For many farms, sprinkler irrigation offers a practical balance between cost, coverage, and flexibility.
Step 1: Evaluate Your Farm’s Water Needs
Before buying equipment, start with a clear understanding of your farm’s irrigation requirements. The size of your land, type of crops, soil composition, slope, and local climate all affect how much water you need and how often you need it.
Ask these questions:
- What crops will be irrigated?
- How many acres need coverage?
- What is the water-holding capacity of the soil?
- Is the field flat, sloped, or uneven?
- How much water is available from wells, ponds, canals, or tanks?
These details help determine the system size, sprinkler spacing, pipe diameter, and pump capacity. A system that is too small will underperform, while one that is oversized may waste money and energy.
Step 2: Choose the Right Sprinkler Irrigation Design
There are several sprinkler system configurations, and the best one depends on your farm layout and crop needs. Common options include portable systems, semi-permanent systems, solid-set systems, and center pivot systems.
Portable Systems
Portable sprinklers can be moved from one field to another. They are often a good choice for smaller farms or operations that need flexibility.
Semi-Permanent Systems
These systems have fixed main lines with movable laterals. They offer a practical middle ground between convenience and cost.
Solid-Set Systems
Solid-set sprinkler systems remain in place throughout the season. They are ideal for orchards, specialty crops, and fields that require frequent irrigation.
Center Pivot Systems
Center pivot irrigation is efficient for large, open fields. It rotates around a central point, watering a large circular area with less manual labor.
Choosing the right design is one of the most important decisions in setting up a sprinkler irrigation system on your farm. The right system should match your crop pattern, labor availability, and budget.
Step 3: Calculate Water Flow and Pressure Requirements
A sprinkler irrigation system depends on proper water flow and pressure to function effectively. If pressure is too low, the sprinklers won’t distribute water evenly. If it is too high, you may waste water and damage equipment.
To size the system correctly, you need to know:
- The total water demand of the irrigated area
- The output capacity of your water source
- The pressure requirements of the sprinkler heads
- The friction loss in pipes and fittings
It’s a smart idea to work with an irrigation specialist or use system design tools to calculate these numbers accurately. Proper pressure and flow ensure uniform coverage and better crop performance.
Step 4: Select Quality Components
Every sprinkler irrigation system is only as reliable as its parts. Investing in durable, well-matched components reduces repairs and improves long-term efficiency.
Essential components include:
- Water source – well, pond, reservoir, canal, or tank
- Pump – provides the pressure needed for distribution
- Mainline and lateral pipes – carry water throughout the system
- Sprinkler heads – distribute water over the crop area
- Valves and fittings – control flow and connect sections
- Filters – prevent clogging from debris or sediment
- Pressure regulator – maintains consistent system pressure
Choose sprinkler heads based on droplet size, spray radius, and application rate. For some crops and soils, gentle application is better to prevent erosion and runoff.
Step 5: Plan the Layout Carefully
Good irrigation design depends on smart layout planning. The goal is to ensure uniform water coverage without leaving dry spots or creating oversaturated areas.
When planning the layout, consider:
- Spacing between sprinkler heads
- Distance between lateral lines
- Field shape and boundaries
- Wind exposure
- Elevation changes
Sprinkler heads should overlap enough to provide even watering across the entire field. Poor spacing can lead to uneven growth, water stress, and reduced yields. On sloped land, pressure and flow adjustments may be needed to keep distribution consistent.
Step 6: Install the Pump and Pipe Network
Once the design is finalized, installation can begin. Start with the pump and water intake system, since this is the foundation of the entire setup. The pump should be sized to match your required flow rate and pressure.
Next, install the mainlines and lateral pipes according to the planned layout. Keep pipe runs as efficient as possible to reduce pressure loss. Make sure all connections are secure and leak-free.
Installation tips:
- Place the pump on stable ground
- Use proper pipe supports where needed
- Install filters before the sprinkler network
- Test all joints before full operation
- Flush the system before attaching sprinkler heads
Careful installation helps prevent future breakdowns and keeps the system operating efficiently from the start.
Step 7: Attach and Test the Sprinkler Heads
After the piping is in place, install the sprinkler heads at the planned intervals. Make sure each head is oriented correctly and set to the appropriate spray pattern.
Before putting the system into regular use, run a full test cycle. Check for:
- Leaks at pipe joints or fittings
- Uneven spray patterns
- Low-pressure zones
- Clogged nozzles
- Overspray outside the target area
Testing allows you to fine-tune the system before crops depend on it. Small adjustments now can prevent major irrigation problems later.
Step 8: Set an Irrigation Schedule
Even the best sprinkler irrigation system needs a proper schedule. Watering too often can lead to root diseases and nutrient loss, while watering too little can stress crops and reduce yields.
Your schedule should be based on:
- Crop water requirements
- Soil type and moisture retention
- Weather conditions
- Growth stage of the crop
- Recent rainfall
Use soil moisture checks, weather data, or irrigation controllers to guide timing. A consistent schedule helps you deliver water when crops need it most.
Step 9: Maintain the System Regularly
Routine maintenance is essential for keeping your sprinkler irrigation system working efficiently. Over time, filters clog, sprinkler nozzles wear out, and pipes may leak or shift.
Maintenance checklist:
- Clean filters regularly
- Inspect sprinkler heads for blockages or damage
- Check pressure levels during operation
- Look for leaks in pipes and fittings
- Flush lines to remove sediment
- Replace worn parts as needed
By staying on top of maintenance, you can extend the life of your system and protect your investment.
Common Mistakes to Avoid
Many irrigation problems come from planning or installation mistakes. Avoiding these issues can improve performance and reduce unnecessary costs.
Common errors include: undersizing the pump, poor sprinkler spacing, ignoring pressure loss, using dirty water without filtration, and failing to test the system after installation.
Careful planning and regular monitoring help you avoid these setbacks and get better results from your sprinkler irrigation system.
Conclusion: Build for Efficiency and Long-Term Success
Setting up a sprinkler irrigation system on your farm takes planning, but the payoff can be significant. With the right design, quality equipment, and consistent maintenance, you can improve water efficiency, support healthier crops, and make irrigation management easier.
If you’re ready to move forward, start by evaluating your field conditions and water supply, then design a system that fits your farm’s needs. A well-built sprinkler irrigation system is more than just equipment—it is a long-term investment in productivity, sustainability, and farm success.