Getting soil moisture right before sowing can make the difference between a weak, uneven crop and a strong, uniform stand. If the seedbed is too dry, seeds may sit and fail to germinate properly. If it is too wet, soil can crust, compact, or rot the seed before it has a chance to sprout. Smart soil moisture management before sowing helps farmers save seed, improve emergence, and set the crop up for a healthier season.
This guide explains how to check soil moisture, prepare the seedbed, and make practical decisions before planting. Whether you grow cereals, pulses, oilseeds, vegetables, or forage crops, these soil moisture management tips can help you sow with confidence.
Why Soil Moisture Matters Before Sowing
Seeds need moisture to begin germination. Once they absorb enough water, they activate enzymes, swell, and start root growth. But germination depends on more than just water alone. The soil must also have the right structure, air pockets, and temperature.
Proper soil moisture before sowing helps:
- Promote fast and uniform germination
- Improve seed-to-soil contact
- Reduce seed loss and replanting costs
- Support early root development
- Improve crop establishment and final yield potential
When moisture is managed poorly, even high-quality seed may perform badly. That is why checking field conditions before sowing is one of the most important steps in crop planning.
How to Check Soil Moisture Before Planting
You do not always need advanced equipment to know whether a field is ready for sowing. Simple field checks can tell you a lot about moisture levels.
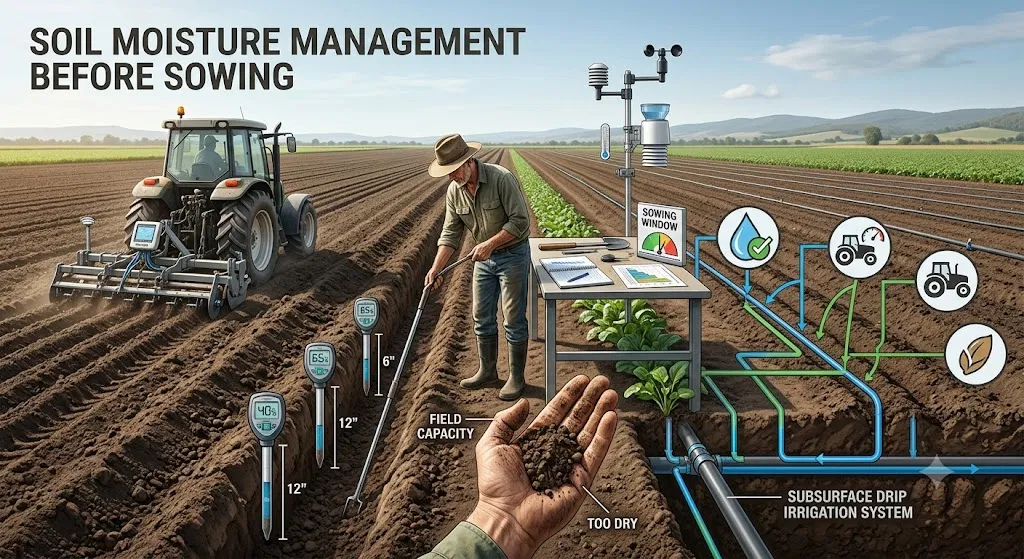
1. The Hand Test
Take a handful of soil from the seed depth and squeeze it lightly.
- If it forms a firm ball and leaves moisture on your hand, the soil may be too wet.
- If it falls apart immediately and feels dusty, the soil may be too dry.
- If it holds together lightly and breaks with gentle pressure, moisture is often suitable for sowing.
2. The Spade Test
Dig a small hole and inspect the soil profile. Look for moisture consistency from the top layer down to seed depth. The seedbed should have enough moisture for germination, but not be saturated.
3. Soil Moisture Sensors
For larger farms or more precise scheduling, soil moisture sensors provide useful data. These tools help farmers monitor moisture levels at different depths and decide when to sow or wait.
4. Weather and Forecast Check
Always review the forecast before sowing. A small rainfall can help dry soil reach the right moisture level, while heavy rain after sowing can damage the seedbed. Temperature and wind also affect how quickly soil dries.
Best Soil Moisture Conditions for Sowing
The ideal moisture level depends on soil type, crop type, and local climate. Still, some general rules apply.
- Sandy soils dry out quickly and may need timely sowing after rainfall or irrigation.
- Clay soils hold more water and can become sticky or compacted if worked too wet.
- Loam soils usually provide the best balance of water retention and aeration.
The seedbed should be moist enough to support quick germination, but loose enough to allow roots and shoots to move freely. If the soil sticks to tools, smears when pressed, or forms a shiny layer, it is usually too wet to sow.
Practical Steps to Manage Soil Moisture Before Sowing
1. Time Tillage Correctly
One of the biggest mistakes farmers make is working soil when it is too wet. Tillage in wet conditions can destroy soil structure, create compaction, and reduce pore space. This harms drainage and root growth later on.
Wait until the soil is workable. It should crumble, not smear. Good timing protects the seedbed and improves moisture movement after sowing.
2. Use Pre-Sowing Irrigation Wisely
In dry regions or during late planting windows, a light pre-sowing irrigation may be useful. The goal is to bring the soil into the ideal germination range without saturating it.
Keep these points in mind:
- Apply only enough water to wet the seed zone
- Avoid over-irrigation that causes runoff or waterlogging
- Allow time for excess water to drain before planting
- Match irrigation depth to the crop’s seed placement
3. Prepare a Fine but Stable Seedbed
A good seedbed supports moisture conservation and seed contact. Break large clods, level the surface, and avoid over-pulverizing the soil. A seedbed that is too loose can dry out quickly, while one that is too compact can restrict emergence.
4. Conserve Existing Soil Moisture
Before sowing, protect the moisture already in the field. Small actions can make a big difference.
- Minimize unnecessary field traffic
- Reduce excessive tillage passes
- Keep the soil covered with residues where suitable
- Prevent surface crusting by avoiding overworking the top layer
Conservation of soil moisture is especially important in dryland farming, where every millimeter of water counts.
5. Match Sowing Depth to Moisture Level
Seed placement matters. If moisture is limited near the surface, planting too shallow may cause poor germination. If planted too deep, weak seedlings may struggle to emerge.
The best sowing depth is the depth where moisture is consistently available and the seed can still emerge easily. Always follow crop-specific recommendations and adjust slightly based on soil conditions.
Common Mistakes Farmers Should Avoid
Even experienced farmers can lose yield potential by overlooking basic moisture management. Avoid these common mistakes:
- Sowing too early after rain — Wet soil can compact easily and reduce emergence.
- Waiting too long after irrigation — The surface may dry out before seedlings establish.
- Ignoring soil type — Clay and sandy soils behave very differently.
- Over-tilling — This can destroy structure and cause moisture loss.
- Using uneven fields without leveling — Water distribution becomes inconsistent.
How Residue and Mulch Help Soil Moisture
Crop residues and mulch can play a major role in soil moisture retention before sowing. They reduce evaporation, protect the surface from crusting, and improve infiltration during rainfall or irrigation.
Healthy residue management can help the soil hold moisture longer and create more stable sowing conditions.
However, residue should be managed carefully. Too much residue in the wrong system can interfere with seed placement or create uneven germination. Use the approach that fits your crop and machinery.
Adapting Moisture Management to Different Seasons
Soil moisture management before sowing is not the same in every season. In hot, dry periods, the priority is conserving water and sowing quickly after rainfall or irrigation. In cooler or wetter periods, drainage and soil traffic control become more important.
Seasonal adjustments may include:
- Planting earlier in the day to reduce moisture loss
- Avoiding field entry after heavy rain
- Using raised beds or drainage channels in wet conditions
- Applying mulch or residue cover in hot climates
Final Pre-Sowing Moisture Checklist
Before you sow, make sure the field is ready:
- Soil is moist, not saturated
- Seedbed is fine, level, and firm enough for contact
- No smearing or compaction is visible
- Weather forecast supports planting
- Sowing depth matches current moisture conditions
- Irrigation or rainfall has been properly timed
Conclusion: Start with Moisture, Finish with Stronger Emergence
Soil moisture management before sowing is one of the simplest ways to improve crop establishment and protect yield potential. By checking field moisture, timing operations carefully, conserving water in the seedbed, and avoiding compaction, farmers can give seeds the best possible start.
Good sowing begins long before the seed enters the ground. Make moisture management part of your pre-plant routine, and you will build a stronger foundation for better germination, healthier seedlings, and a more productive crop.