A shade net house can transform crop protection, improve yield quality, and help growers manage heat, sunlight, wind, and pests more effectively. Whether you are planning a small nursery structure or a larger commercial setup, learning how to set up a shade net house step by step is the key to building a durable, efficient growing environment.
In this guide, you’ll find a practical, SEO-friendly, and easy-to-follow process for setting up a shade net house from planning to final inspection. If you want long-term performance and better crop results, getting the installation right from the start matters.
What Is a Shade Net House?
A shade net house is a protected cultivation structure covered with specially designed netting that reduces sunlight intensity and creates a controlled microclimate for plants. It is widely used for vegetables, flowers, nurseries, medicinal plants, and high-value crops that need protection from harsh weather conditions.
The main purpose of a shade net house is to regulate light, temperature, and airflow while still allowing enough ventilation for healthy plant growth.
Why Set Up a Shade Net House?
Before moving into installation, it helps to understand the benefits. A properly installed shade net house can:
- Reduce direct sunlight and heat stress
- Protect plants from heavy rain and strong winds
- Lower pest pressure and physical damage
- Improve crop quality and uniform growth
- Support off-season and high-value production
- Help nurseries maintain stronger seedlings
Pro tip: The quality of your structure and the way it is installed will directly affect its lifespan and performance.
Step 1: Choose the Right Location
The first step in setting up a shade net house is selecting the right site. The location should be level, accessible, and suitable for crop production. A poor site can lead to drainage problems, structural instability, and maintenance issues later.
What to look for in a site:
- Good sunlight exposure for the growing season
- Level or gently sloping land
- Proper drainage to prevent waterlogging
- Easy access to water and electricity if needed
- Protection from extremely strong winds where possible
- Enough space for movement, storage, and crop operations
It is also wise to test the soil and check local weather patterns before construction begins.
Step 2: Decide the Size and Design
The size of your shade net house should match your crop type, budget, and production goals. A nursery may need a different layout from a commercial vegetable or flower setup. At this stage, decide the height, width, length, and orientation of the structure.
Important design considerations:
- Crop requirements for light and airflow
- Local wind and rainfall conditions
- Budget for materials and labor
- Expected scale of production
- Future expansion plans
Most growers prefer a design that supports easy movement, good air circulation, and efficient irrigation.
Step 3: Select the Shade Net Material
Choosing the right shade net is one of the most important parts of the process. Shade nets come in different colors, densities, and materials, and each option affects crop performance differently.
Common shade net choices:
- Green shade net: Often used for general crop protection
- Black shade net: Popular for reducing sunlight intensity
- White or silver shade net: Helps reflect heat and light
The shade percentage usually ranges from 35% to 75%, depending on crop needs. For example, nursery plants may require a different level of shading than flowering crops or leafy vegetables.
The best shade net is not the one with the highest shading percentage, but the one that matches your crop, climate, and production goals.
Step 4: Prepare the Foundation
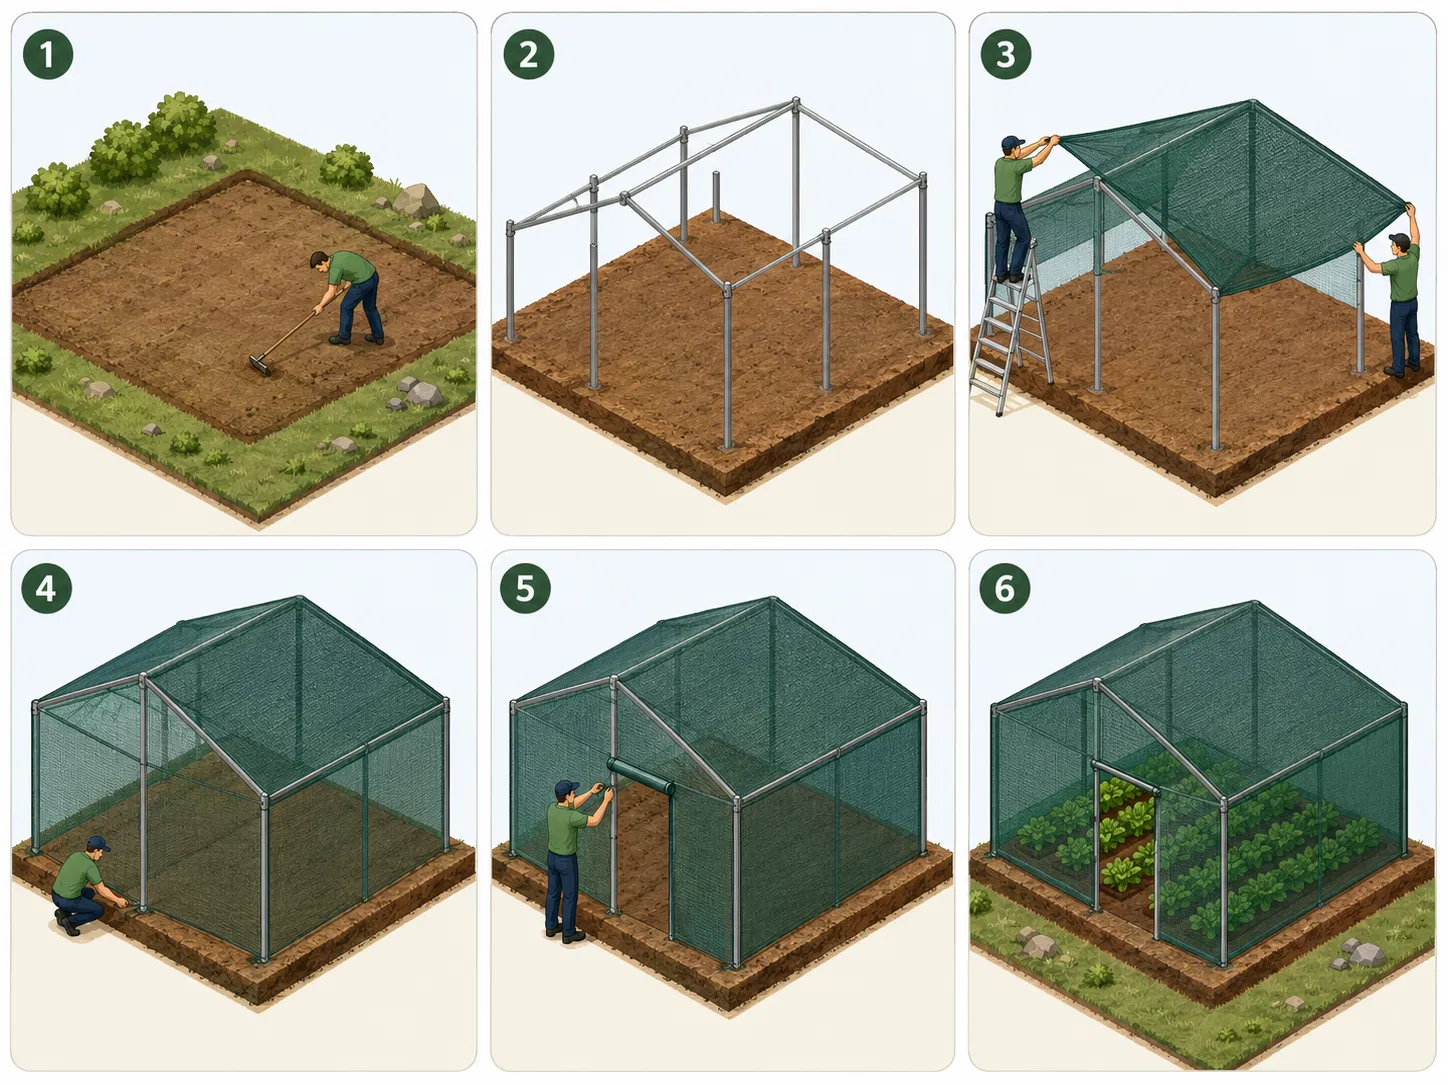
A strong foundation is essential for a stable shade net house. This step ensures the frame remains secure during wind, rain, and long-term use. Begin by clearing the area and marking the dimensions accurately.
Foundation preparation includes:
- Clearing stones, weeds, and debris from the site
- Marking the boundary with measuring tools
- Leveling the ground where needed
- Digging holes for posts according to the design
- Setting the foundation depth based on soil and wind conditions
For a durable setup, make sure the posts are firmly anchored and aligned correctly before moving ahead.
Step 5: Install the Main Frame
The frame is the backbone of the shade net house. It is usually made of galvanized steel, iron, or other corrosion-resistant materials. Proper frame installation helps the structure withstand weather conditions and supports the shade net evenly.
Frame installation process:
- Place and secure the vertical posts
- Fix the horizontal beams and side supports
- Install roof supports and bracing
- Check alignment and spacing carefully
- Tighten all joints and fasteners
At this stage, precision is important. A crooked or weak frame can create stress on the net and reduce the structure’s lifespan.
Step 6: Install the Shade Net
Once the frame is ready, it is time to install the shade net. This step should be done carefully to avoid tearing, sagging, or uneven tension. The net must be fixed securely so it stays in place during wind and regular use.
Shade net installation tips:
- Unroll the net evenly across the frame
- Keep the net stretched but not overly tight
- Use appropriate clips, wires, or fasteners
- Secure edges properly to prevent lifting
- Overlap sections where necessary
A well-installed net should cover the structure uniformly and provide consistent shade throughout the house.
Step 7: Set Up Ventilation and Access Points
Good airflow is essential in a shade net house. Without proper ventilation, humidity can build up and create conditions for disease or poor plant growth. Doors, side openings, and ventilation gaps should be planned during installation.
Ventilation features to include:
- Entrance doors for easy access
- Side openings or roll-up panels where suitable
- Open spacing for air movement
- Optional insect-proof mesh if pest control is needed
Ventilation design should balance protection with plant health. Too little airflow can be just as harmful as too much exposure.
Step 8: Install Irrigation and Internal Layout
A shade net house works best when water distribution is efficient. Depending on your crop, you may choose drip irrigation, sprinkler systems, or misting setups. Planning irrigation early saves time and reduces future modifications.
Internal setup may include:
- Drip lines or sprinklers
- Water storage and filtration systems
- Raised beds or planting benches
- Walkways for maintenance and harvesting
- Support structures for pots or trays
Arrange the internal layout so that plant care, irrigation, and harvesting remain easy and efficient.
Step 9: Inspect the Structure Thoroughly
After installation, inspect the entire shade net house before use. This is the stage where you identify weak points, loose fittings, or uneven areas that may affect performance later.
Inspection checklist:
- Check frame stability and alignment
- Confirm all fasteners are secure
- Look for tears or gaps in the shade net
- Test doors and access points
- Verify proper drainage around the structure
- Make sure irrigation lines are working correctly
If any issue is found, fix it immediately before introducing crops.
Step 10: Maintain the Shade Net House Regularly
Setting up a shade net house is only the beginning. Regular maintenance helps protect your investment and keeps the structure functioning properly over time. Even the best-built house needs routine attention.
Maintenance tasks to follow:
- Clean the net periodically to remove dust and debris
- Repair small tears before they grow larger
- Check post stability after storms or heavy winds
- Inspect irrigation lines for leaks or blockages
- Remove weeds and maintain drainage channels
Consistent care extends the life of the shade net house and supports better crop results.
Final Thoughts
Knowing how to set up a shade net house step by step gives you a clear advantage, whether you are growing seedlings, vegetables, or ornamental crops. From choosing the right site and materials to installing the frame, net, ventilation, and irrigation, each step contributes to a stronger and more productive structure.
If you want long-term success, focus on planning, quality materials, and proper installation. A well-built shade net house is more than a shelter—it is a smart growing system that supports healthier plants and better yields.