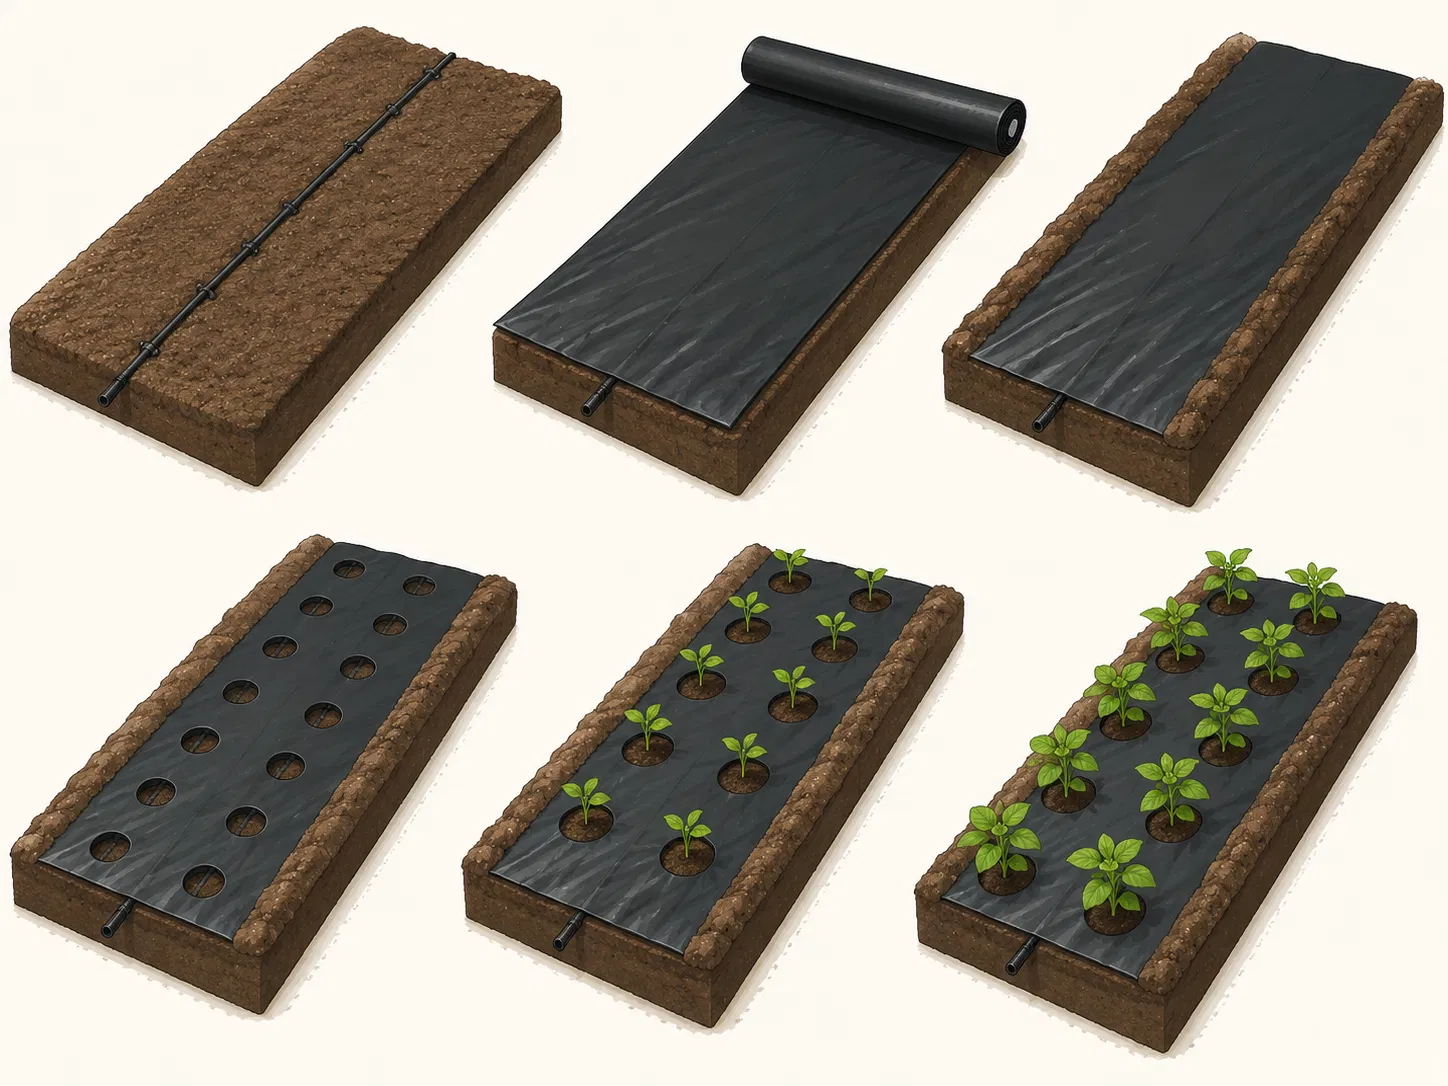
If you want cleaner garden beds, fewer weeds, and better moisture retention, learning how to lay a mulching sheet correctly is one of the smartest landscaping steps you can take. Done right, a mulching sheet creates a neat, durable barrier that helps suppress weeds while supporting healthier plants and easier maintenance. Done poorly, it can lead to wrinkles, weak coverage, or weeds sneaking through the gaps.
This guide walks you through the right way to install a mulching sheet so you get long-lasting results and a professional-looking finish.
What Is a Mulching Sheet?
A mulching sheet is a protective ground cover placed over soil to block sunlight, reduce weed growth, and help retain moisture. It is commonly used in flower beds, vegetable gardens, around trees, and in landscaped areas where low maintenance is a priority.
Depending on your project, you may see it called weed barrier fabric, landscape fabric, or garden mulching film. While materials vary, the goal is the same: create a stable, weed-resistant layer that supports plant health and keeps your garden beds tidy.
Why Proper Installation Matters
Installing a mulching sheet correctly makes a big difference in performance. If the sheet is loose, exposed at the edges, or installed on uneven soil, weeds can still break through and the material may shift over time.
Proper installation helps you:
- Suppress weeds more effectively
- Reduce watering needs by slowing moisture loss
- Improve the appearance of garden beds
- Make maintenance easier over time
- Support healthier plant growth by protecting roots
Tools and Materials You’ll Need
Before you start, gather everything you need so the installation goes smoothly.
- Mulching sheet or landscape fabric
- Scissors or utility knife
- Garden rake
- Shovel or hoe
- Landscape pins or U-shaped staples
- Measuring tape
- Mulch, gravel, or decorative ground cover for topping
- Gloves
Step 1: Prepare the Area
Start by clearing the bed completely. Remove weeds, grass, sticks, rocks, and any debris that could interfere with a smooth installation. If weeds are already established, dig them out at the root. A mulching sheet works best when placed on a clean, even surface.
Use a rake to level the soil and break up large clumps. If the ground is uneven, the sheet may sag or tear in places. Good preparation is essential for a long-lasting result.
Step 2: Measure the Space
Measure the area carefully before cutting your sheet. It is better to have a little extra material than to come up short. For larger beds, plan how the sections will overlap so there are no exposed gaps.
When covering a wide area, overlapping the edges by several inches helps prevent weeds from growing through the seams.
Step 3: Lay the Mulching Sheet Flat
Roll the mulching sheet over the prepared soil and position it so it covers the full planting area. Keep it as flat and even as possible. Avoid stretching it tightly, since a little slack allows the material to settle naturally without tearing.
If you are using multiple pieces, overlap them slightly. This creates a more continuous barrier and reduces the chance of weed growth between sections.
Tip: Smooth placement is just as important as full coverage. Wrinkles and gaps can weaken the weed barrier over time.
Step 4: Cut Openings for Plants
Once the sheet is in place, mark where each plant will go. Cut a small X or circle in the fabric just large enough for the plant base. Avoid making openings too big, because exposed soil around the plant can invite weeds.
If you are planting new shrubs or flowers, make the cuts after the sheet is laid and then position the plant carefully through the opening. For existing plants, work around the stems and roots with care.
Step 5: Secure the Sheet Firmly
Anchoring the mulching sheet is one of the most important steps. Use landscape pins or staples around the perimeter and throughout the middle of the sheet to keep it from moving in the wind or shifting over time.
Place pins:
- Along every edge
- At overlaps between sheets
- Near plant openings
- At regular intervals across larger areas
Spacing the pins evenly helps the sheet stay tight against the soil and prevents lifting.
Step 6: Add a Top Layer of Mulch
Although the sheet itself provides weed control, adding a top layer of mulch improves both performance and appearance. Organic mulch, bark chips, gravel, or decorative stone can help protect the sheet from UV exposure and give the bed a finished look.
A top layer also helps weigh the sheet down and reduces the chance of shifting. Keep mulch away from direct contact with plant stems to prevent moisture buildup and rot.
Best Practices for Long-Lasting Results
To get the most out of your mulching sheet, keep these simple best practices in mind:
- Always install on weed-free, level soil
- Overlap seams to prevent gaps
- Use enough pins to hold the sheet securely
- Cut small openings around plants
- Cover the sheet with mulch or another top dressing
- Check periodically for tears, exposed edges, or weed growth
Taking a little extra time during installation pays off with less maintenance later.
Common Mistakes to Avoid
Even a quality mulching sheet can fail if it is installed incorrectly. Watch out for these common mistakes:
- Installing over existing weeds
- Leaving large gaps around plants
- Not securing the edges properly
- Using too few pins
- Skipping the top layer of mulch
- Placing the sheet on rough or uneven soil
Avoiding these issues will help the sheet last longer and perform much better.
When to Replace or Repair a Mulching Sheet
Over time, even a well-installed mulching sheet may need attention. Look for signs such as fraying edges, torn sections, weed penetration, or shifting caused by weather or foot traffic. If damage is minor, you may be able to patch the area or add more pins. If the material has broken down significantly, replacement is often the best option.
Conclusion
Knowing how to lay a mulching sheet correctly can save you time, reduce weeds, and make your garden beds look polished and professional. The key is simple: prepare the soil well, lay the sheet flat, secure it properly, and finish with a protective top layer.
With the right installation, your mulching sheet can become one of the most effective tools in your garden maintenance routine. If you are planning a new bed or refreshing an existing one, now is the perfect time to put these steps into practice and enjoy a cleaner, easier-to-manage outdoor space.