Water is one of your field’s most valuable resources, and using it wisely can make the difference between average results and a truly productive growing season. A well-designed drip watering system delivers moisture directly to plant roots, reduces waste, and helps you maintain healthier crops with less effort. Whether you’re managing vegetables, orchards, vineyards, or row crops, drip irrigation can be a smart long-term investment.
Why Drip Watering Systems Work So Well
Unlike overhead watering methods, a drip watering system applies water slowly and precisely at the root zone. This means less evaporation, less runoff, and fewer weeds competing for moisture. It also helps reduce leaf wetness, which can lower the risk of disease in many crops.
For farmers and field growers, the benefits are hard to ignore:
- Improved water efficiency with targeted delivery
- Better crop consistency from even soil moisture
- Reduced labor compared to manual watering
- Lower fertilizer loss when paired with fertigation
- Less soil erosion and surface runoff
Step 1: Evaluate Your Field Conditions
Before buying equipment, start with a careful assessment of your field. Every site is different, and the best drip irrigation design depends on soil, crop type, water source, and field layout. A system that works perfectly for sandy soil may not be ideal for clay-heavy ground.
Check These Key Factors
- Crop type: Deep-rooted crops, shallow-rooted vegetables, and permanent plantings need different emitter spacing and flow rates.
- Soil texture: Sandy soils absorb water quickly, while clay soils spread moisture more slowly.
- Field slope: Sloped land may require pressure compensation to keep water distribution even.
- Water quality: Sediment, minerals, or algae can clog emitters if filtration is not properly designed.
- Water pressure and flow: Your pump or supply line must meet the system’s demand.
Step 2: Choose the Right Drip Irrigation Components
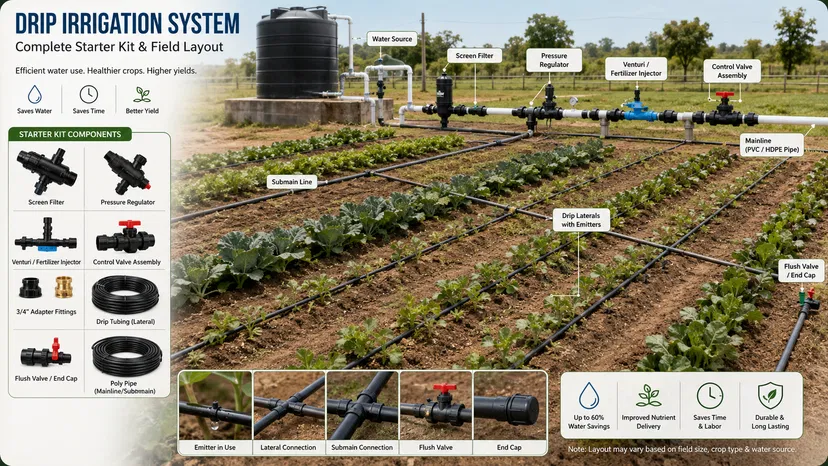
A successful drip watering system is built from several core components working together. Choosing the right parts from the beginning helps prevent inefficiency and costly repairs later.
Main System Components
- Water source: Well, reservoir, canal, or municipal supply
- Pump: Used to deliver the required pressure and flow
- Filtration system: Screen, sand, or disc filters to reduce clogging
- Mainline and submain pipes: Transport water across the field
- Drip laterals or drip tape: Deliver water directly to the crop
- Emitters: Release water at a controlled rate
- Pressure regulators: Keep water distribution consistent
- Valves and fittings: Control zones and simplify maintenance
For large fields, consider zoning the system so different sections can be watered separately. This improves control and helps match irrigation timing to crop needs, soil variation, or sun exposure.
Step 3: Design for Uniform Water Distribution
Uniformity is one of the most important parts of drip irrigation design. If some plants get too much water while others get too little, your yield and crop quality can suffer. The goal is to ensure each emitter provides a predictable amount of water across the entire field.
To improve uniform distribution, focus on these design principles:
- Use pressure-compensating emitters when field elevation changes or line lengths are long.
- Keep lateral lines within recommended lengths to avoid pressure loss.
- Match emitter spacing to crop spacing and root spread.
- Calculate total flow demand before selecting a pump or pipe size.
- Account for friction loss in long pipelines and fittings.
“A drip system is only as good as its design. Precision in pressure, spacing, and filtration leads to precision in the field.”
Step 4: Plan Emitter Spacing and Flow Rate
Emitter spacing and flow rate should be based on your crop’s water needs and your soil’s ability to absorb moisture. The wrong spacing can create dry gaps or water pooling, both of which reduce performance.
As a general guide:
- Sandy soil: Closer emitter spacing and lower flow rates may be needed to prevent deep percolation.
- Loamy soil: Moderate spacing often works well for many crops.
- Clay soil: Wider spacing and slower application rates help reduce surface runoff.
For row crops, drip tape is often installed near the base of each row. For orchards and vineyards, individual emitters or inline drip tubing can be placed around each plant’s root zone. The exact setup should align with how roots develop over time.
Step 5: Include Filtration and Maintenance Access
Clogging is one of the biggest threats to drip irrigation performance. Even small particles can block emitters and disrupt water delivery. That’s why filtration is not optional—it is essential.
A strong filtration strategy should include:
- Primary filtration matched to the type of water source
- Flush valves at the ends of lines for routine cleaning
- Pressure gauges to help detect blockages or pressure changes
- Easy access points for inspection and repair
Routine maintenance should be part of your design from day one. A drip watering system that is easy to flush and inspect will last longer and perform more reliably throughout the season.
Step 6: Automate Where Possible
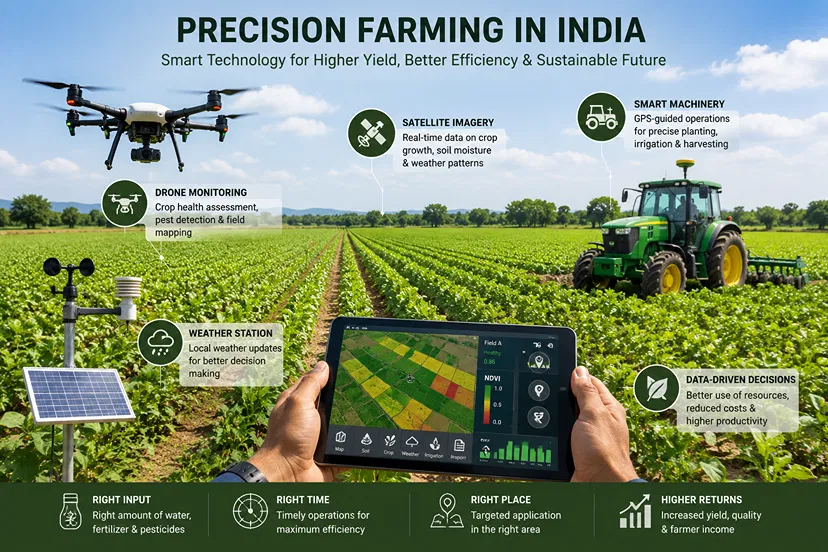
Automation can save time, improve consistency, and reduce human error. With timers, moisture sensors, or smart controllers, you can water your field based on actual crop conditions rather than guesswork.
Helpful automation tools include:
- Timers for set irrigation schedules
- Soil moisture sensors to prevent overwatering
- Weather-based controllers that adjust for rainfall and evaporation
- Flow meters to monitor system performance
Automation is especially valuable on large fields where manual monitoring is time-consuming. It also supports better water conservation, which matters more each season.
Step 7: Test, Monitor, and Adjust
Once your drip irrigation system is installed, don’t assume it will run perfectly forever. Testing and monitoring are essential for maintaining performance. Check pressure, flow, and emitter output regularly, especially during the first weeks of use.
Watch for common warning signs such as:
- Uneven plant growth
- Dry spots or soggy patches
- Reduced pressure at line ends
- Clogged or leaking emitters
- Unexpected spikes in water use
Small adjustments to timing, pressure, or emitter layout can make a major difference in crop response. Field conditions change, and your irrigation plan should change with them.
Best Practices for Long-Term Success
Designing a drip watering system is not just about installation. It’s about building a reliable, scalable solution for your field’s future. To get the most from your system, follow these best practices:
- Design with your crop’s full growth cycle in mind.
- Use quality materials that can withstand sun, pressure, and soil conditions.
- Install proper filtration from the beginning.
- Inspect lines regularly for leaks, clogs, and pressure changes.
- Keep records of watering schedules, repairs, and yield results.
Conclusion: Build a System That Saves Water and Supports Growth
A thoughtfully designed drip watering system can transform the way your field performs. By matching your irrigation setup to your soil, crop, and water supply, you create a system that conserves water, supports healthy roots, and improves crop quality. The key is to plan carefully, choose the right components, and monitor performance over time.
If you want better yields and smarter water use, start by designing your drip irrigation system with precision. A well-built system pays off season after season, helping your field grow stronger with every drop.